
Have you ever wished you could effortlessly whip up stunning desserts that would make Martha Stewart green with envy? Well, buckle up buttercup, because we’ve got the scoop on how to achieve effortless elegance in the world of dessert-making. Say goodbye to sweating over a hot stove and hello to wowing your friends and family with delicious treats that are as easy to make as they are to devour. Get ready to become the dessert deity you were always meant to be without breaking a sweat.
Contents
Creating Mouthwatering Fruit Tarts
Are you looking to impress your friends and family with some delicious homemade fruit tarts? Look no further than this guide to creating mouthwatering treats that will have everyone coming back for seconds (and maybe even thirds)!
First things first, you’ll want to start with a buttery, flaky tart crust. This is the foundation of your tart and will make or break your dessert. Use a combination of flour, sugar, butter, and a pinch of salt to create the perfect crust. Make sure to blind bake it before adding your filling to ensure it stays nice and crisp!
Next up, let’s talk about the filling. The possibilities are endless when it comes to fruit tarts, so get creative! Whether you prefer a classic pastry cream topped with fresh berries or a tangy lemon curd with sliced peaches, the key is to use the freshest, ripest fruit you can find. Don’t be afraid to mix and match different fruits for a colorful and flavorful tart that will wow your taste buds.
And finally, don’t forget the finishing touches! A dusting of powdered sugar, a dollop of whipped cream, or a drizzle of chocolate sauce can take your fruit tart to the next level. Experiment with different toppings to find the perfect combination that suits your taste buds. So roll up your sleeves, grab your favorite fruits, and get ready to create a masterpiece that will have everyone begging for your secret recipe!
Mastering French Macarons with Finesse
Congratulations! You have taken the first step in the delicious world of French macarons. These delicate meringue-based treats may seem intimidating at first, but with the right finesse, you will become a macaron master in no time.
Here are some tips and tricks to help you perfect your macaron-making skills:
- Ingredients: Make sure you are using high-quality ingredients, especially almond flour and aged egg whites. The fresher the ingredients, the better the macarons.
- Macaronage: This is the fancy French term for gently folding the dry ingredients into the meringue. Be gentle, yet assertive with your folding to achieve the perfect consistency.
- Piping: Invest in a good piping bag and tip to pipe out uniform macaron shells. Practice your piping skills on a lined baking sheet before going for the real deal.
- Baking: Keep a close eye on your macarons while they are in the oven. They can go from perfectly crisp to burnt in a matter of seconds. And remember, patience is key – let the macarons cool completely before filling and enjoying.

Whipping Up Decadent Chocolate Mousse
Who doesn’t love a good ol’ chocolate mousse? It’s fluffy, it’s creamy, and it’s oh-so-decadent. Plus, it’s a dessert that never fails to impress. So, if you’re in the mood to whip up some chocolatey goodness, then you’ve come to the right place!
First things first, gather all your ingredients. You’ll need:
- 1 cup of heavy cream
- 8 ounces of semisweet chocolate, chopped
- 2 tablespoons of sugar
- 1 teaspoon of vanilla extract
Now, onto the fun part – the actual mousse-making process. Start by heating up the heavy cream until it’s just about to boil. Pour it over the chopped chocolate and let it sit for a minute or two. Then, stir it until it’s nice and smooth. Add in the sugar and vanilla extract, and give it another good stir.
Next, whip up the mixture until it’s nice and fluffy. This might take a few minutes, but trust me – it’s worth it. Once you’ve achieved that perfect, light-as-air consistency, spoon the mousse into individual serving dishes and pop them in the fridge to chill. And voila – you’ve got yourself a decadent chocolate mousse that’ll have everyone begging for seconds!

Perfecting the Art of Layered Trifles
Layered trifles are a work of art, a masterpiece that requires precision, skill, and a touch of creativity. To truly perfect the art of layered trifles, one must pay attention to every detail, from the choice of ingredients to the arrangement of layers. Here are some tips to help you become a trifle master:
Choose the perfect vessel: The vessel in which you assemble your trifle is crucial. A transparent glass bowl or trifle dish is ideal to showcase the beautiful layers of your creation. Plus, it adds that extra touch of elegance to your dessert.
Play with flavors: Don’t just stick to the traditional fruit and custard layers. Get creative with different flavor combinations, like chocolate and peanut butter, or lemon and raspberry. Experiment with different types of sponge cake or biscuits for added texture and depth.
Pay attention to aesthetics: Presentation is key when it comes to layered trifles. Make sure each layer is evenly spread and perfectly level, creating a beautiful visual impact. Garnish with fresh fruit, chocolate shavings, or edible flowers to elevate the look of your trifle.
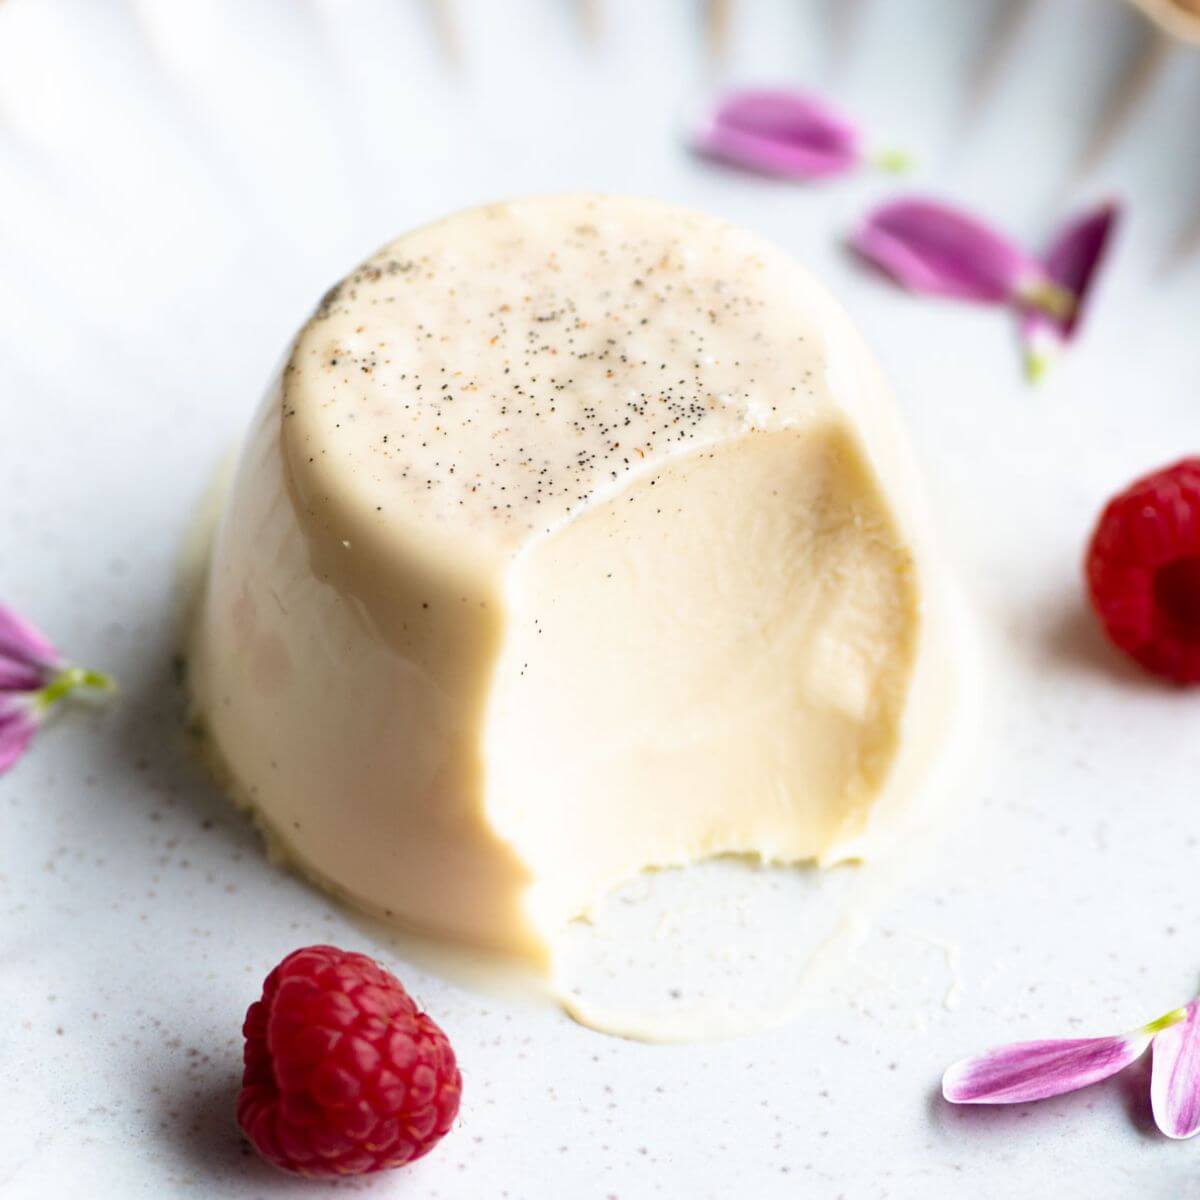
Crafting Delicate Panna Cotta
If you’re feeling fancy and want to impress your dinner guests with a dessert that looks way more complicated than it actually is, then you’ve come to the right place. may sound intimidating, but trust me, it’s easier than it looks. Plus, it sounds much fancier than saying “Italian custard.”
First things first, gather your ingredients. You’ll need heavy cream, sugar, gelatin, and vanilla. Don’t forget to grab some fresh berries for a pop of color and flavor on top! Pro-tip: use fresh vanilla beans instead of extract for that extra touch of sophistication.
Once you’ve got everything you need, it’s time to get cooking. Heat the cream, sugar, and vanilla in a saucepan until it’s just about to boil. Then, sprinkle in the gelatin and whisk until fully dissolved. Pour the mixture into ramekins or fancy molds and chill in the fridge for at least 4 hours or until set. Voilà, you’ve just made Panna Cotta!
When you’re ready to serve, gently run a knife around the edge of each ramekin and invert the Panna Cotta onto a plate. Top with your favorite fresh berries and maybe a sprig of mint for that extra Instagram-worthy touch. Your guests will be impressed, and you can take all the credit for crafting this delicate dessert like a pro.
Baking Show-Stopping Pavlovas
Ready to impress all your friends and family with a show-stopping dessert? Look no further than these mouth-watering pavlovas! These delicate meringue nests topped with whipped cream and fresh fruit are sure to steal the spotlight at any gathering.
To get started, preheat your oven to 250 degrees Fahrenheit and line a baking sheet with parchment paper. In a large mixing bowl, beat 4 egg whites until stiff peaks form. Slowly add in 1 cup of sugar and continue to beat until the mixture is glossy and holds its shape. Spoon the meringue onto the prepared baking sheet in individual nests, making a slight well in the center of each.
Bake for 1 hour, then turn off the oven and let the pavlovas cool completely inside. Once cooled, top each nest with a dollop of whipped cream and your favorite fresh fruit. Strawberries, kiwi, and passion fruit are all great options! For an extra touch of sweetness, drizzle with honey or a berry coulis.
So next time you want to wow your guests with a stunning dessert, give these pavlovas a try! With their crisp exterior, chewy interior, and burst of fruity flavor, they’re sure to be a hit. Get ready to take a bow as everyone showers you with compliments and demands the recipe!
Indulging in Effortless Elegance: Stunning Desserts with Ease
Are you tired of slaving away in the kitchen for hours just to create a dessert that looks like it belongs on a magazine cover? Well, fear not! With these simple tips and tricks, you can indulge in effortless elegance and create stunning desserts with ease.
First things first, presentation is key. Invest in some decorative plates and serving platters to elevate your desserts to the next level. Sprinkle some powdered sugar or cocoa on top for a touch of sophistication. If you’re feeling really fancy, you can even add a sprig of mint or a drizzle of chocolate sauce for that extra wow factor.
Next, let’s talk about flavors. Don’t be afraid to experiment with different flavor combinations. Think outside the box and try pairing unexpected ingredients together. A dash of sea salt on top of a chocolate tart or a hint of lavender in your cupcakes can really take your desserts to the next level.
And last but not least, remember to have fun! Baking should be a stress-free and enjoyable experience. So put on some music, pour yourself a glass of wine, and get creative in the kitchen. With a little bit of effort and a whole lot of elegance, you’ll have stunning desserts that will impress even the most discerning of guests.
FAQs
Why should I bother with elegant desserts when I can just buy them at the store?
Because who needs store-bought when you can impress your friends and family with your culinary prowess? Plus, have you ever tasted the satisfaction of taking that first bite of a dessert you made yourself? Pure bliss.
I’m not very skilled in the kitchen. Can I still create stunning desserts with ease?
Absolutely! These recipes are designed for even the most novice of bakers. As long as you can measure and follow directions (somewhat), you’ll be on your way to dessert perfection.
How can I make desserts look elegant without spending hours in the kitchen?
It’s all about presentation, baby. A little drizzle here, a sprinkle there, and suddenly your dessert looks like it came straight out of a fancy patisserie. Plus, we’ll provide some shortcuts and tips to make the process as painless as possible.
Do I need any special equipment or ingredients to create these stunning desserts?
Nope! Just your standard kitchen gear and a few easily accessible ingredients. We firmly believe that elegance should be achievable for all, regardless of what’s in your pantry.
Can I make these desserts in advance for a dinner party or special occasion?
You betcha! In fact, some of these desserts actually taste better when they’ve had time to chill in the fridge for a bit. So go ahead and wow your guests with a stunning dessert spread, all without breaking a sweat.
—
Indulge in Effortless Elegance
Go ahead and treat yourself to some stunning desserts with ease! You don’t have to be a master chef to create edible works of art. With a little creativity and some handy tips, you can impress your friends and family with your effortless elegance in the kitchen. So go on, whip up something delightful and revel in the satisfaction of creating beautiful desserts without breaking a sweat. Bon appétit!
