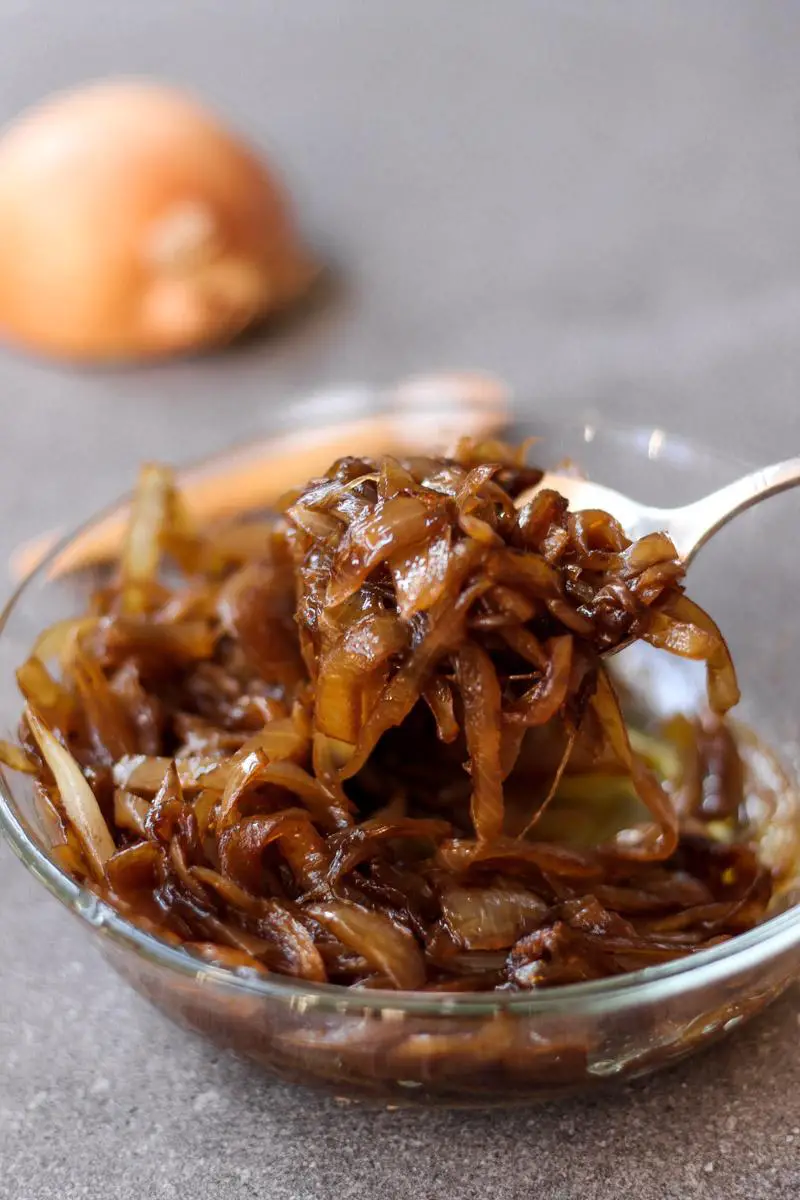
Welcome to the ultimate guide for achieving caramelized onion perfection! Have you ever tried to sauté onions only to end up with a sad, soggy mess? Fear not, because with these quick tips, you’ll be caramelizing onions like a pro in no time. Get ready to elevate your dishes to gourmet status and impress your taste buds with the sweet, savory goodness of perfectly caramelized onions. So grab your apron and let’s get cooking!
Contents
Choosing the Right Onions for Caramelizing
So, you’ve decided to caramelize some onions. Great choice! But before you start chopping away, it’s important to choose the right onions for the job. After all, not all onions are created equal when it comes to caramelization.
When selecting onions for caramelizing, you’ll want to opt for ones that are naturally sweet and have a low sulfur content. This will ensure that your caramelized onions are rich and flavorful, without any bitter undertones. Here are a few onion varieties that are perfect for caramelizing:
- Vidalia Onions: These sweet, mild onions are practically made for caramelizing. Their low sulfur content makes them ideal for achieving that perfect golden-brown hue.
- Maui Onions: Known for their sweet and juicy flavor, Maui onions are another great choice for caramelizing. Plus, they add a touch of tropical flair to your dish!
- Sweet Onions: Whether it’s Walla Walla, Texas Sweet, or another variety, sweet onions are always a safe bet for caramelizing. Their natural sweetness makes for deliciously caramelized onions every time.
Remember, when it comes to caramelizing onions, the key is patience. Don’t rush the process – let the onions cook low and slow until they reach that perfect soft, caramelized state. With the right onions and a little bit of time, you’ll have a batch of heavenly caramelized onions that will take your dishes to the next level!

Preparing the Onions for Cooking
So, you’ve decided to take the plunge and cook with onions! Congratulations, you brave soul. But before you dive headfirst into the tears and sweet, sweet aroma of caramelized onions, you need to know how to prepare these tricky little devils.
First things first, you need to peel those onions. It’s like an onion’s version of taking off a jacket – but much messier. Cut off the stem end and then peel away the skin. It’s okay if you cry a little – onions are known for their ability to bring out all the feels.
Next, you’ll want to slice or dice those bad boys. Your choice really depends on what you’re cooking. Want big chunks of onion in your stir-fry? Go for the slice. Need finely diced onion for your guacamole? Opt for the dice. Just make sure to keep those fingers out of the way – knives and onions have been known to have a volatile relationship.
Lastly, if you’re looking to caramelize those onions to perfection, don’t rush the process. Low and slow is the way to go. Let those slices or dices simmer in butter or oil until they reach that beautiful golden-brown color. It may take a little time, but trust me, it’s worth it. And remember – no matter how much you cry, those onions will always be there for you when you need them most.

Selecting the Ideal Cooking Fat
When it comes to , there are a plethora of options to choose from. From butter to coconut oil to duck fat, the possibilities are endless. But fear not, dear reader, for we are here to guide you through this oily maze and help you pick the perfect fat for all your culinary adventures.
First and foremost, consider the smoke point of the cooking fat. No one wants to set off the fire alarm in the middle of preparing a delicious meal. Opt for fats with a high smoke point like avocado oil or ghee for high-heat cooking methods such as searing or frying.
Another important factor to consider is the flavor profile of the cooking fat. Butter adds a rich and creamy taste, while olive oil brings a fruity and slightly peppery note to your dishes. Experiment with different fats to see which one complements your ingredients the best.
Lastly, don’t forget about the health benefits of the cooking fat. Coconut oil is lauded for its antimicrobial and anti-inflammatory properties, while olive oil is packed with heart-healthy monounsaturated fats. Choose fats that not only taste good but also provide nutritional perks.
 Temperature“>
Utilizing the Correct Temperature
So, you think you know how to cook, huh? Let me ask you this – do you really know how to utilize the correct temperature? Let’s find out!
First things first, when it comes to cooking, temperature is everything. You can’t just throw your food in the oven and hope for the best – you need to know what you’re doing! Here are a few tips to help you master the art of temperature:
- Preheat like your life depends on it: Seriously, don’t be lazy and skip this step. Preheating your oven ensures that your food cooks evenly and thoroughly.
- Know your numbers: Different foods require different temperatures. Don’t just wing it – look up the recommended cooking temperatures for whatever dish you’re making.
- Baby, it’s cold outside: Remember that cooking times may vary depending on the temperature of your ingredients. Let that butter soften before you start baking!
So, the next time you’re in the kitchen, remember the golden rule: when in doubt, check the temperature. You’ll thank me later when your food turns out perfect every time!

Patiently Cooking the Onions to Perfection
When it comes to cooking onions, patience is key. You can’t rush perfection, especially when it comes to caramelizing those deliciously sweet and tangy layers of flavor. So grab your cutting board, sharpen your knife, and get ready to transform those tear-inducing bulbs into a masterpiece of culinary excellence.
First things first, make sure you’ve got a sharp knife and a sturdy cutting board. A dull blade will only make the process more frustrating, and nobody wants to deal with unevenly chopped onions. So sharpen that sucker up and get to work. And don’t forget to have a tissue or two on hand – those onion tears are no joke.
Next, heat up your trusty pan with a generous glug of olive oil or butter. You want to cook those onions low and slow, so don’t rush the process. Let them sweat it out and slowly transform into a golden brown masterpiece. And don’t forget to stir occasionally – you don’t want any burnt bits ruining your hard work.
Once your onions are soft, sweet, and beautifully caramelized, it’s time to add them to your dish of choice. Whether it’s a hearty soup, a savory stew, or a mouthwatering pasta dish, those perfectly cooked onions will take your recipe to the next level. So sit back, relax, and savor the fruits of your labor – you’ve earned it.
Adding Seasonings for Depth of Flavor
Seasonings are the secret weapons in a chef’s arsenal for creating depth of flavor in any dish. Forget the bland and boring, it’s time to spice things up! But before you go crazy with the salt and pepper, let’s explore some unexpected seasonings that will take your culinary creations to the next level.
First up, let’s talk about herbs. Fresh herbs like rosemary, thyme, and basil can add a pop of freshness to any dish. Don’t be afraid to experiment with combinations like mint and cilantro or dill and parsley. The more herbs, the merrier! And if you’re feeling adventurous, try adding edible flowers like lavender or nasturtium for a floral twist.
Next, let’s not forget about spices. Cumin, coriander, and paprika are classics that can add warmth and complexity to your dishes. But why stop there? How about trying out some exotic spices like sumac or za’atar for a Middle Eastern flair? And don’t underestimate the power of a little cinnamon or nutmeg in savory dishes – it’s like a warm hug for your taste buds.
Lastly, let’s talk about umami. Soy sauce, miso, and fish sauce can add that savory, meaty richness that takes your dish from good to gourmet. And speaking of umami, don’t forget about Parmesan cheese – a sprinkle of this salty, nutty goodness can elevate any pasta dish to new heights. So go ahead, play around with different seasonings and discover a whole new world of flavor!
Achieving Consistent Results with Practice
So you want to achieve consistent results with practice, eh? Well, you’re in luck because I’ve got some tips and tricks that will help you do just that!
First things first, you’ve got to put in the time. Practice makes perfect, right? Well, maybe not perfect, but pretty darn close! Whether you’re practicing a new skill or honing an old one, the more you practice, the better you’ll get. It’s simple math, really.
Secondly, don’t be afraid to mix things up. Trying out different techniques or approaches can help you find what works best for you. Plus, it keeps things interesting! Who wants to do the same thing over and over again? Not me, that’s for sure.
And lastly, set some goals for yourself. Having something to strive for can help keep you motivated and on track. Whether it’s mastering a specific skill or achieving a certain level of success, having clear goals in mind will help you stay focused and determined. So go ahead, set those goals and crush them like the boss you are!
FAQs
What’s the best type of onion to use for caramelizing?
If you want perfectly caramelized onions, go for a sweeter variety like yellow onions. They have a higher sugar content which helps them caramelize beautifully.
How thin should I slice the onions?
The key to perfectly caramelized onions is to slice them thin but not so thin that they disappear into oblivion. Aim for slices that are about 1/4 inch thick for the perfect balance of texture and flavor.
What’s the best type of pan to use for caramelizing onions?
For the best results, use a heavy-bottomed pan like a cast iron skillet. The even heat distribution will help prevent hot spots and ensure that your onions cook evenly.
How long should I cook the onions for?
Patience is key when caramelizing onions. Cook them low and slow over medium-low heat, stirring occasionally, for about 45 minutes to an hour. You’ll know they’re ready when they’re soft, golden brown, and oh-so-sweet.
Can I add anything to the onions for extra flavor?
Absolutely! Add a pinch of salt to help draw out the onions’ natural juices and enhance their sweetness. You can also throw in a splash of balsamic vinegar or a sprinkle of brown sugar for an extra layer of flavor.
—
Time to Caramelize Like a Pro!
Congratulations, you’ve now mastered the art of perfectly caramelized onions! With these quick tips and tricks, you’ll be impressing friends and family with your onion caramelizing skills in no time. Just remember, practice makes perfect, so don’t be afraid to experiment and try new techniques.
So go on, grab those onions and get caramelizing! And don’t forget to enjoy the deliciously sweet and savory results of your hard work. Happy cooking!


